이전 포스트에 이어 Canvas의 기초에 대해 더 알아보려 한다.
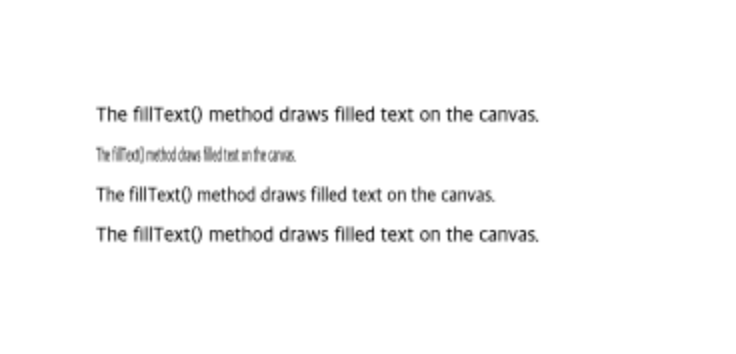
글씨 쓰기 글씨 그리기 1 2 3 4 5 6 var canvas = document .getElementById('myCanvas' );var ctx = canvas.getContext('2d' );ctx.fillText('The fillText() method draws filled text on the canvas.' , 50 , 100 ); ctx.fillText('The fillText() method draws filled text on the canvas.' , 50 , 120 , 100 ); ctx.fillText('The fillText() method draws filled text on the canvas.' , 50 , 140 , 200 ); ctx.fillText('The fillText() method draws filled text on the canvas.' , 50 , 160 , 300 );
context.fillText(text, x, y, maxWidth)
글씨 크기를 크게 변경하기 1 2 3 4 5 var canvas = document .getElementById('myCanvas' );var ctx = canvas.getContext('2d' );ctx.fillStyle = '#6495ED' ; ctx.font = 'italic bold 28px Arial, sans-serif' ; ctx.fillText("Hello Canvas World!" , 50 , 100 );
글씨의 외곽선 그리기 1 2 3 4 5 6 7 var canvas = document .getElementById('myCanvas' );var ctx = canvas.getContext('2d' );ctx.fillStyle = '#6495ED' ; ctx.font = 'italic bold 40px Arial, sans-serif' ; ctx.fillText("Hello Canvas World!" , 10 , 100 ); ctx.lineWidth = 2 ; ctx.strokeText("Hello Canvas World!" , 10 , 100 );
strokeText 함수로 외곽선만 있는 글씨를 표시한다.
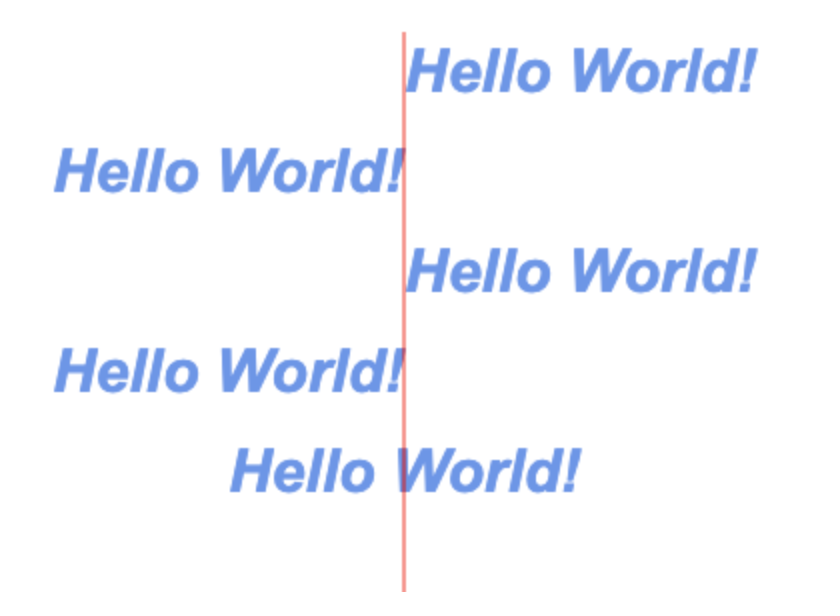
글씨의 좌우 정렬 알아보기 1 2 3 4 5 6 7 8 9 10 11 12 13 14 15 16 17 18 19 20 21 22 23 24 var canvas = document .getElementById('myCanvas' );var ctx = canvas.getContext('2d' );ctx.fillStyle = '#6495ED' ; ctx.font = 'italic bold 30px Arial, sans-serif' ; ctx.textAlign = "start" ; ctx.fillText("Hello World!" , 200 , 50 ); ctx.textAlign = "end" ; ctx.fillText("Hello World!" , 200 , 50 ); ctx.textAlign = "left" ; ctx.fillText("Hello World!" , 200 , 50 ); ctx.textAlign = "right" ; ctx.fillText("Hello World!" , 200 , 50 ); ctx.textAlign = "center" ; ctx.fillText("Hello World!" , 200 , 50 ); ctx.strokeStyle = 'red' ; ctx.moveTo(200 , 20 ); ctx.lineTo(200 , 370 ); ctx.stroke();
textAlign
start: 시작점 기준(기본)
end: 끝점 기준
left: 글씨의 왼쪽 기준
right: 글씨의 오른쪽 기준
center: 중심 기준
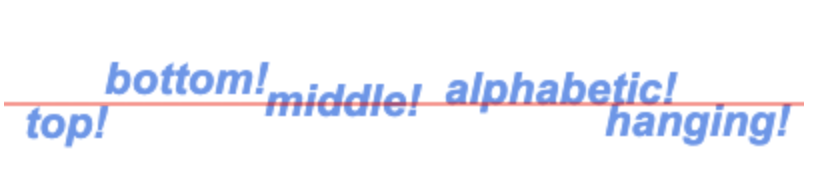
글씨의 상하정렬 1 2 3 4 5 6 7 8 9 10 11 12 13 14 15 16 17 18 19 20 21 22 23 24 var canvas = document .getElementById('myCanvas' );var ctx = canvas.getContext('2d' );ctx.fillStyle = '#6495ED' ; ctx.font = 'italic bold 22px Arial, sans-serif' ; ctx.textBaseline = "top" ; ctx.fillText("top!" , 10 , 150 ); ctx.textBaseline = "bottom" ; ctx.fillText("bottom!" , 50 , 150 ); ctx.textBaseline = "middle" ; ctx.fillText("middle!" , 130 , 150 ); ctx.textBaseline = "alphabetic" ; ctx.fillText("alphabetic!" , 220 , 150 ); ctx.textBaseline = "hanging" ; ctx.fillText("hanging!" , 300 , 150 ); ctx.strokeStyle = 'red' ; ctx.moveTo(0 , 150 ); ctx.lineTo(400 , 150 ); ctx.stroke();
textBaseline (베이스 라인 기준)
top: 글씨의 위에 정렬
bottom: 글씨의 바닥에 정렬
center: 글씨의 중간에 정렬
alphabetic: 기본값
hanging: 글씨의 바로 위에 정렬
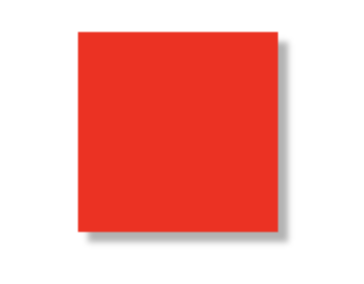
그림자 그리기 사각형의 그림자 1 2 3 4 5 6 7 8 var canvas = document .getElementById('myCanvas' );var ctx = canvas.getContext('2d' );ctx.shadowColor = 'rgba(0, 0, 0, 0.3)' ; ctx.shadowOffsetX = 5 ; ctx.shadowOffsetY = 5 ; ctx.shadowBlur = 3 ; ctx.fillStyle = 'red' ; ctx.fillRect(50 , 50 , 100 , 100 );
shadowColor: 그림자의 색상
shadowOffsetX: 그림자의 간격을 x: 5 만큼 이동
shadowOffsetY: 그림자의 간격을 y: 5 만큼 이동
shadowBlur: 그림자의 흐림도
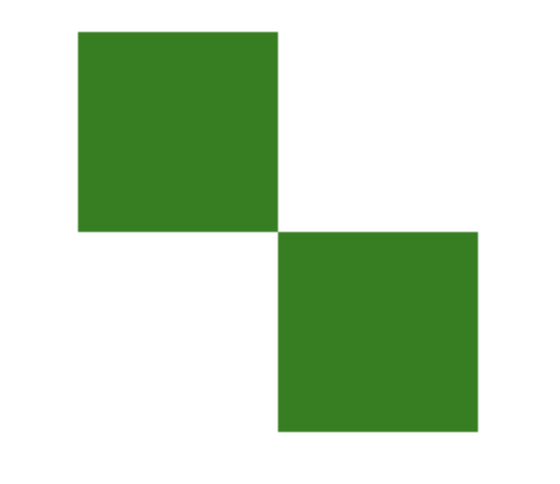
이동, 회전, 스케일, 변형하기 위치 이동시키기 1 2 3 4 5 6 var canvas = document .getElementById('myCanvas' );var ctx = canvas.getContext('2d' );ctx.fillStyle = 'green' ; ctx.fillRect(50 , 50 , 100 , 100 ); ctx.translate(100 , 100 ); ctx.fillRect(50 , 50 , 100 , 100 );
translate 를 사용하여 다음에 나오는 객체를 이동시킨다. css 의 translate 같다.
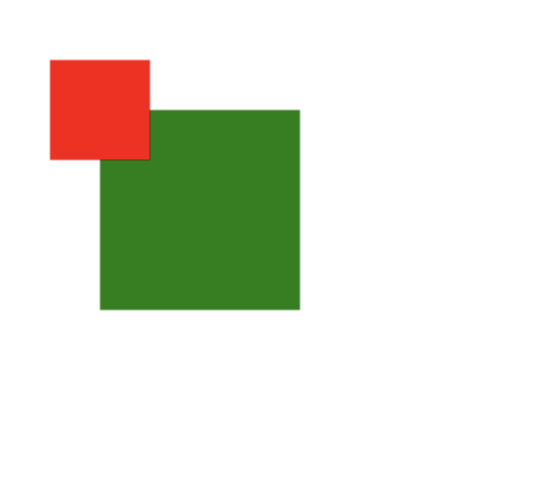
크기 변형하기 1 2 3 4 5 6 7 var canvas = document .getElementById('myCanvas' );var ctx = canvas.getContext('2d' );ctx.fillStyle = 'green' ; ctx.fillRect(50 , 50 , 100 , 100 ); ctx.scale(100 , 100 ); ctx.fillStyle = 'red' ; ctx.fillRect(50 , 50 , 100 , 100 );
위의 예제에서는 크기를 절반으로 줄였다. 기준점(0,0)으로 하여 크기를 줄이기 때문에 제자리에서 크기가 줄지 않고,
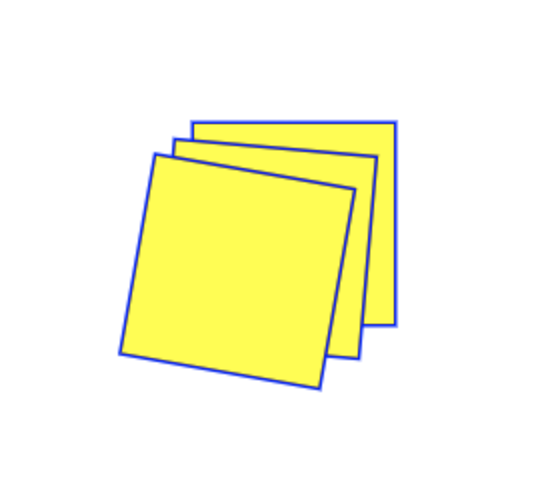
회전시키기 1 2 3 4 5 6 7 8 9 10 11 12 13 14 15 var canvas = document .getElementById('myCanvas' );var ctx = canvas.getContext('2d' );ctx.fillStyle = 'yellow' ; ctx.strokeStyle = 'blue' ; ctx.lineWidth = 3 ; ctx.strokeRect(100 , 100 , 100 , 100 ); ctx.fillRect(100 , 100 , 100 , 100 ); ctx.rotate(5 * Math .PI / 180 ); ctx.strokeRect(100 , 100 , 100 , 100 ); ctx.fillRect(100 , 100 , 100 , 100 ); ctx.rotate(5 * Math .PI / 180 ); ctx.strokeRect(100 , 100 , 100 , 100 ); ctx.fillRect(100 , 100 , 100 , 100 );
사각형 형태 변형하기 1 2 3 4 5 6 7 8 9 10 11 var canvas = document .getElementById('myCanvas' );var ctx = canvas.getContext('2d' );ctx.fillStyle = 'yellow' ; ctx.strokeStyle = 'blue' ; ctx.lineWidth = 3 ; ctx.strokeRect(0 , 0 , 100 , 100 ); ctx.fillRect(0 , 0 , 100 , 100 ); ctx.transform(1.5 , 0 , 0 , 1.5 , 100 , 100 ); ctx.strokeRect(0 , 0 , 100 , 100 ); ctx.fillRect(0 , 0 , 100 , 100 );
context.transform(s1, sk1, sk2, s2, m1, m2)
기울기 1 2 3 ctx.transform(1 , 0.2 , 0.2 , 1 , 100 , 100 );
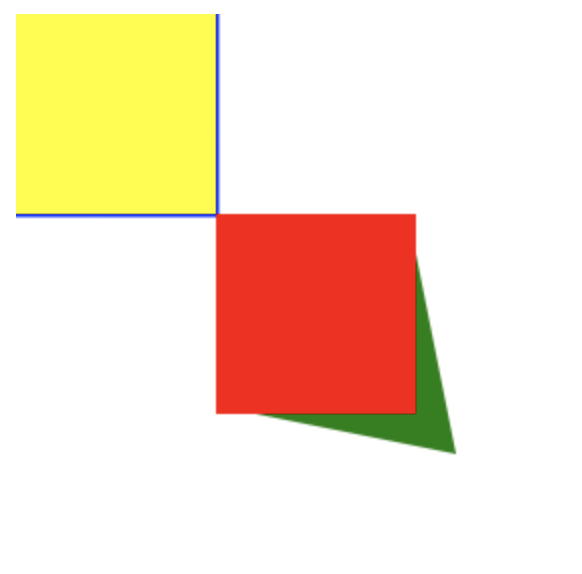
1 2 3 4 5 6 7 8 9 10 11 12 13 14 15 var canvas = document .getElementById('myCanvas' );var ctx = canvas.getContext('2d' );ctx.fillStyle = 'yellow' ; ctx.strokeStyle = 'blue' ; ctx.lineWidth = 3 ; ctx.strokeRect(0 , 0 , 100 , 100 ); ctx.fillRect(0 , 0 , 100 , 100 ); ctx.transform(1 , 0.2 , 0.2 , 1 , 100 , 100 ); ctx.fillStyle = 'green' ; ctx.fillRect(0 , 0 , 100 , 100 ); ctx.setTransform(1 , 0 , 0 , 1 , 100 , 100 ); ctx.fillStyle = 'red' ; ctx.fillRect(0 , 0 , 100 , 100 );
색상 보정하기 캔버스에서 일부분을 가져와서 색상을 바꾸어 그린다.
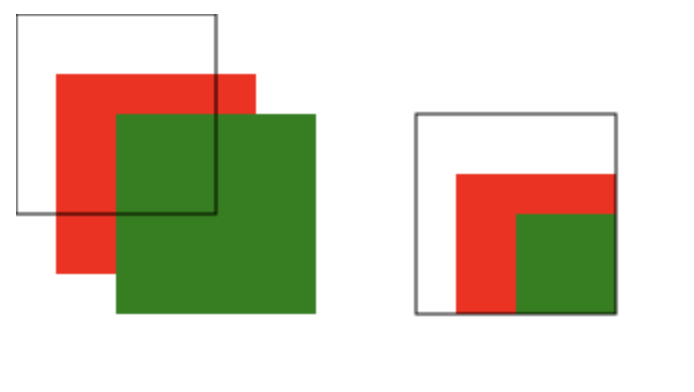
1 2 3 4 5 6 7 8 9 10 11 var canvas = document .getElementById('myCanvas' );var ctx = canvas.getContext('2d' );ctx.fillStyle = 'red' ; ctx.fillRect(20 , 30 , 100 , 100 ); ctx.fillStyle = 'green' ; ctx.fillRect(50 , 50 , 100 , 100 ); var src = ctx.getImageData(0 , 0 , 100 , 100 );ctx.putImageData(src, 200 , 50 ); ctx.strokeRect(0 , 0 , 100 , 100 ); ctx.strokeRect(200 , 50 , 100 , 100 );
getImageData context.getImageData(x, y, width, height)
x: 왼쪽 상단의 x 좌표
y: 왼쪽 상단의 y 좌표
width: 사각형 영역의 폭
height: 사각형 영역의 높이
putImageData context.putImageData(imgData, x, y, dirtyX, dirtyY, dirtyWidth, dirtyHeight)
imgData: getImageData 로 가져온 이미지 값
x: 왼쪽 상단의 X 좌표
y: 왼쪽 상단의 y 좌표
dirtyX: 가져올 이미지의 x 좌표
dirtyY: 가져올 이미지의 y 좌표
dirtyWidth: 가져와서 그릴 사각형 영역의 폭
dirtyHeight: 가져와서 그릴 사각형 영역의 높이
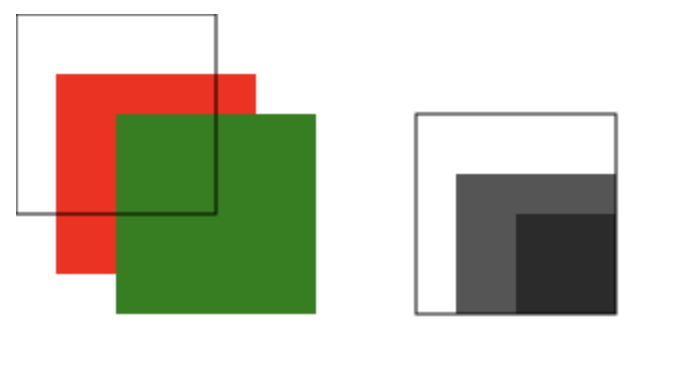
지정한 부분의 색상을 흑백으로 바꾸어 출력하기 1 2 3 4 5 6 7 8 9 10 11 12 13 14 15 16 17 18 19 20 21 22 var canvas = document .getElementById('myCanvas' );var ctx = canvas.getContext('2d' );ctx.fillStyle = 'red' ; ctx.fillRect(20 , 30 , 100 , 100 ); ctx.fillStyle = 'green' ; ctx.fillRect(50 , 50 , 100 , 100 ); var src = ctx.getImageData(0 , 0 , 100 , 100 );var pixels = src.data;var numPixels = pixels.length;for (var i=0 ; i < numPixels; i++) { var avg = (pixels[i*4 ] + pixels[i*4 +1 ] + pixels[i*4 +2 ]) / 3 ; pixels[i*4 ] = avg; pixels[i*4 +1 ] = avg; pixels[i*4 +2 ] = avg; } ctx.putImageData(src, 200 , 50 ); ctx.strokeRect(0 , 0 , 100 , 100 ); ctx.strokeRect(200 , 50 , 100 , 100 );
이미지를 data 로 가져와 확인해보면 rgba 배열로 되어 있다. 각 픽셀의 색상 값을 흑백으로 변경하여 다시 저장한다.
합성하기 두 개 이상의 이미지를 합성하여 새로운 이미지를 만들거나 효과를 주는 방법을 알아본다.
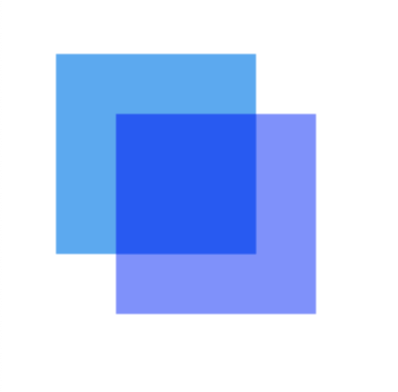
합성에는 다양한 방법이 있는데, 대표적인 방법은 알파값을 이용하여 투명한 이미지를 기존 이미지 위에 올려서
알파값 적용하기 1 2 3 4 5 6 7 var canvas = document .getElementById('myCanvas' );var ctx = canvas.getContext('2d' );ctx.fillStyle = 'rgba(63, 169, 245, 1)' ; ctx.fillRect(20 , 20 , 100 , 100 ); ctx.globalAlpha = 0.5 ; ctx.fillStyle = 'blue' ; ctx.fillRect(50 , 50 , 100 , 100 );
globalAlpha 값이 0.5 적용된 파란색 사각형을 겹쳐서 그리게 적용한다.
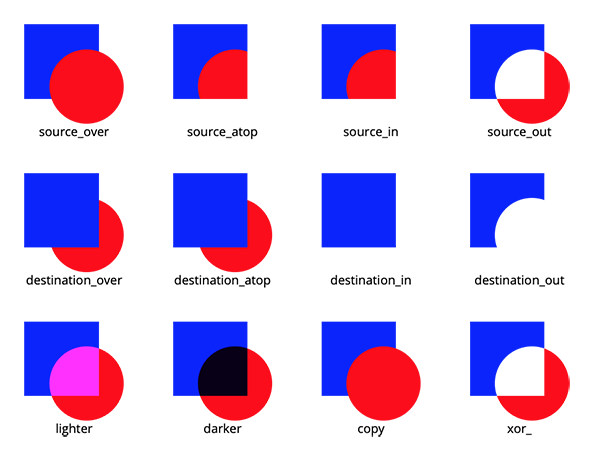
두 개의 이미지를 합성하여 그리기 1 2 3 4 5 6 7 var canvas = document .getElementById('myCanvas' );var ctx = canvas.getContext('2d' );ctx.fillStyle = 'red' ; ctx.fillRect(20 , 20 , 100 , 100 ); ctx.globalCompositeOperation = 'source-over' ; ctx.fillStyle = 'blue' ; ctx.fillRect(50 , 50 , 100 , 100 );
globalCompositeOperation
source-over: 이미지 위에 겹쳐 그린다. (기본)
source-atop: 첫 번째 이미지를 그리고 두 번째 이미지의 겹치는 부분만 그린다.
source-in: 첫 번째 이미지를 그리지 않고 두 번째 이미지의 겹치지 않는 부분만 그린다.
source-out: 첫 번째 이미지를 그리지 않고 그 영역 안에 두 번째 이미지만 그린다.
destination-atop: 첫 번째 이미지를 위로 올리고 두 번째 이미지 전체를 그린다.
destination-in: 첫 번째 이미지를 위로 올리고 두 번째와 겹치는 부분만 그린다.
destination-out: 첫 번째 이미지만 그리고 두 번째 이미지와 겹치는 부분을 지운다.
destination-over: 첫 번째 이미지를 위로 올려 그리고 두 번째 이미지를 아래로 그린다.
lighter: 전체를 그리고 겹친 부분을 가산 혼합한다.
copy: 두 번째 이미지만 남기고 다른 부분은 제거한다.
xor: 전체를 그리고 겹친 부분을 지운다.
참조: HTML5 캔버스 github